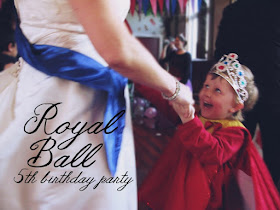
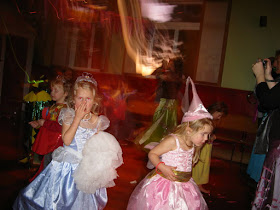
For Miss Fab's fifth birthday we had a Princess Party with a twist... We called it "A Royal Ball" and invited her closest friends to attend with their whole families.
Guests were instructed to come dressed up as Kings, Queens, Princesses, Knights etc (including the grown ups). Getting the grownups to dress up really helped create a great atmosphere of fun, and much anticipation as everyone tried to figure out what to wear (there were a few wedding dresses resurrected on the night).
The party was timed for 4pm-7pm on a Saturday afternoon, so it was getting dark after dinner; perfect for a banquet and a disco. To help with catering for so many guests, each Royal Family was asked to bring something scrummy to the Feast.
We found a lovely local church hall to use, and decorated it with lots of colourful taffeta bunting, balloons and fairy lights. It was a magical night with lots of dancing games, waltzing, boogying and even a Royal Trumpeter.
Here's how I made the Ball so Royal...
 Royal Bunting...
I bought some cheap taffeta ($2 a metre) in crimson, royal blue, pink and mauve (1-2metres of each). I found the quickest way to cut out my triangles was to fold the fabric lengthsways into 3 sections, then cut/rip it into three equal lengths.
Using pinking shears cut diagonally one way, then the other way, to give you a triangle shaped flag. Keep cutting until all the lengths have been cut in triangles. Don't worry if they are a bit irregular! (Note: You must use pinking shears to cut out as it stops the fabric fraying and means you don't have to sew the seams).
Fold over the top of the triangle and press. Hand the triangles to a good friend with a spare morning for her to sew one seam along the top (or if you can sew/have a machine you can do this yourself!)
One evening while you are watching TV, get some lengths of strong twine and thread the flags in a random pattern. Wrap the finished lengths around some cardborad to prevent tangling. That's it!
 Mix your Own Disco CD...
I made my own disco CD, by downloaded this free trial audio mixing software called
MixPad. It's very simple to use; I managed to figure it out without too much bother. I could mixall the songs together with no gaps (you know, one song fading into another). The software expires after about 3 weeks, but the trial version does everything you need. Way cheaper than hiring a DJ - plus you get to use songs you know your kids will dance to. On the night, I just popped it in the CD player and that was that! Instant Disco!
Glowsticks were given as prizes for great dancing; I found some online: $13 for 100 glowsticks with connectors.

 Jewelled Headbands
I forgot to take a photo of the finished articles! (Here's one of the headbands being worn) They looked amazing - my favourite was the black one. Just hot glue-gun a random pattern of 5 jewels onto some cheap fabric covered headbands. The little Princesses loved these and as I said, they looked amazing - for a cost of only .80c each! The next week at kindy it seemed there were jewelled headbands being worn everywhere...
(By the way, did I mention I am now having a love affair with my glue gun?? Where has it been all my life? Why have I only NOW discovered the joys of hot glue??)

Treasure Pouches (Party Bags)
Find some cheap crimson upholstery-type fabric at an Emporium. On the reverse side, trace a circle around a dinner plate. Cut out using pinking shears to avoid fraying/having to sew.
About 1cm from the edge of the circle pinch the fabric and small slits all the way around the edge of the fabric, about 1cm apart.
Thread some cheap gold braid through (tie the ends to create a tassle and avoid fraying) and then tie the ends together. Pull to create a cute treasure pouch; fill with sweeties, gold (chocolate) coins and gold (crunchie) bars.

Gorgeous Cupcakes (fit for a Princess)
So simple... ice with a swirl of pink butter cream icing using a piping kit (available at most $2 shops). Using the piping kit makes it look so professional and it is also extremely Quick! Top with an icing flower or rose. I bought these online on TradeMe. Almost too pretty to eat!
To make 36 cupcakes (!) I doubled the following Edmonds Book recipe...
INGREDIENTS:
125g butter, softened
1 teaspoon vanilla essence
1/2 cup caster sugar
2 eggs
1 cup plain flour
2 teaspoons baking powder
1/4 cup milk
Cream butter, sugar and vanilla together until light and fluffy. Add eggs one at a time, beating well after each addition. Sift flour and baking powder together. Fold into creamed mixture. Stir in milk. Spoon a dessertspoonful of mixture into muffin tins lined with cupcake papers. Bake at 190oC for 15 minutes or until cake springs back when lightly touched.
Jewelled Honey Slice
This recipe is from Desitute Gourmet. It's so easy and can be made ahead of time. I just added chopped glace cherries to give it some "jewels"...
1/2 cup sugar
100g butter
1 Tablespoon honey
1 teaspoon vanilla
5 cups of rice bubble-type cereal
1 packet of glace cherries (chopped) -optional
In a saucepan melt the butter, then add sugar and honey and boil together for 5 minutes or until light golden in colour. Add the cereal and cherries and mix thoroughly.
Press the mixture firmly into a roasting dish lined with baking paper. Place an extra sheet of baking paper on top and press down firmly until well compacted together. Allow to set in the fridge and then cut into squares.
Click here for my Dairy-free Jewelled Banana Muffins recipe
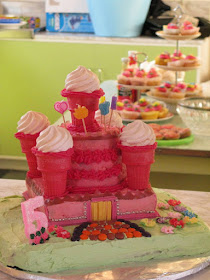
Step-by-Step Castle Cake
Line one roasting dish and one square cake tin with baking paper. Once cooked and colled, skewer together as shown, with the square cake positioned right to the back centre of the rectangular cake.
Mix up one more batch of cake batter (yes, I know it's a huge cake)... and pour into deep, wide tin lined with baking paper. I used a baby formula tin to make sure it was nice and deep. Be careful how you line it as wrinkles in the paper will give you an uneven cake. Once baked and cooled, trim off any bumps and make sure the cylindrical cake is nice and even.
Ice with Buttercream icing - pastel green for the rectangular cake (for the castle's lawn) and pink for the square cake (the base of the castle).

Fix the cylindrical cake into the centre of the square cake with more skewers. Ice with more pink icing and then trim the edges/decorate with something like Uncle Toby's Split Ems' which have a cool zigzag edge.
For the towers use pink cuplet (square bottomed) icecream cones. Fix to the cake with a splodge of icing and then more skewers!
Using a piping kit, ice around the top of each cone and then top with a meringue swirl.
Decorate with sweets, smarties, icing flowers, piping kit, coloured sugar sprinkles, silver cachous... whatever!
More on our Royal Ball (Princess) Party...


 Here's a few photos from last night, emailed to me by my lovely friend Meg, who kindly took lots of photos for me. She's giving me a CD with them on tomorrow (apparently she filled up her whole memory card!) Can't wait to see them... :)


